
We make PDF Maker - Photo to PDF Pro at NabiGame; this guide explains it and the topic, it is not an independent review. To turn photos into a useful PDF on Android, capture readable pages, crop their edges, arrange them in reading order, and check the saved file before sharing. Our app brings photo conversion, cropping, PDF merging, and local document tools into that workflow.
Key takeaways
- Good lighting and sharp source photos matter more than aggressive cleanup.
- Check cropped edges and page order before saving, then inspect the exported PDF.
- Choose compression by readability and the recipient’s upload requirements.
- Local photo conversion and searchable text are different capabilities.
- Use a dedicated OCR workflow when searching or copying photographed text is essential.
Who is this photo-to-PDF workflow for?
We recommend it for students gathering handwritten notes, households organizing receipts, and people assembling photographed paperwork into an attachment. It also suits someone who already has useful pictures in their gallery and wants to arrange them into a document without retaking everything.
Start with the recipient’s needs. Do they want a readable attachment, searchable text, separate documents, or a combined packet? Our rule of thumb: decide the output before taking pictures. If a portal asks for separate supporting documents, keep them separate; if someone requests a combined packet, arrange it around their reading order.
You can find the app on our PDF Maker app page and explore our broader apps and community tools. This guide focuses on document preparation, rather than promising that every photographed form will meet every organization’s submission rules.
How do you photograph documents clearly?
Fix lighting before reaching for filters
Our recommendation is to flatten the paper on a plain surface, use even light, and move the phone until your hand stops casting a shadow over the text. For shiny receipts or laminated pages, change the light’s angle and inspect the preview for glare. Avoid making the page bright at the cost of washing out faint writing.
These are established document-image problems. Adobe’s camera-image guidance, updated October 22, 2026, frames the task this way:
“Learn how to improve document photos by fixing angles, shadows, and lighting for cleaner, clearer PDFs.”
— Adobe, Acrobat Help
Hold the camera roughly parallel to the paper. Leave a little space around the edges so you can judge the crop later. Before putting the original away, zoom into the smallest important writing: a date, reference code, or faint pencil note. If it is unreadable, our recommendation is to retake the photo immediately.
Crop the page without cutting away meaning
PDF Maker’s page editor supports perspective cropping and rotation. Use the crop handles to follow the paper, then check that the resulting page looks upright. Inspect footers, stamps, handwritten additions, and writing close to the margin. A visually tidy crop is not useful if it removes information the recipient needs.
Try a filter only after checking the original. We recommend retaining color when colored annotations or stamps carry meaning. For ordinary text, compare the filtered preview with the source and reject any adjustment that makes faint strokes disappear. Treat filters as choices to review, not a guarantee of improved readability.
Get started in three steps
- Choose your source. Open PDF Maker and tap New PDF. Pick pictures from your gallery or use the camera. Collect the pages for the same document, leaving unrelated pictures out of the selection.
- Review and arrange. Check each page, rotate sideways images, crop unwanted background, and drag pages into reading order. Choose the page layout and quality settings that suit the destination. Use the size estimate as guidance before saving.
- Save and inspect. Give the PDF a recognizable name and save it. Open the result, review the beginning and end of the document, and zoom into fine print before using the share action.
For a receipt packet, we would put related receipts together and choose a filename that describes their purpose. For notes, we would follow the lesson’s sequence rather than the order in which pictures happened to be taken. Read the saved PDF as a recipient would, without relying on your memory of the paper originals.
If the pages already exist as separate PDFs, use the merge tool instead of photographing them again. Arrange the selected files before merging and inspect the resulting boundaries between documents. Keep the inputs until the combined copy has passed your review, especially when attachments contain similar-looking pages.
Real examples
These walk-throughs use the screens in the strip above. Names and numbers are invented for illustration; the limits come from the app source we reviewed.
Linh turns six notebook photos into one A4 PDF
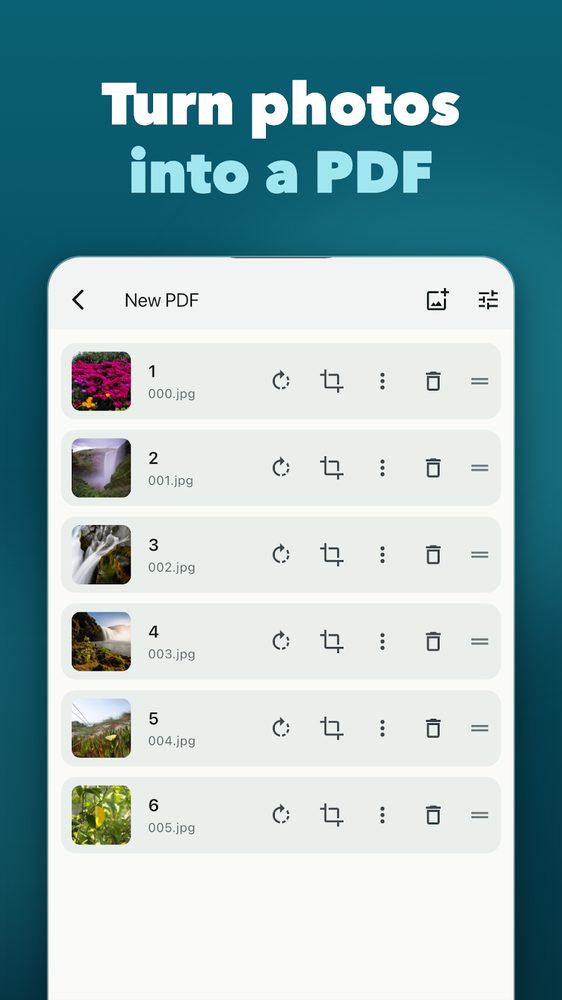
Linh photographed six pages of lecture notes (000.jpg to 005.jpg), but pages 2 and 4 were shot out of order and one is sideways.
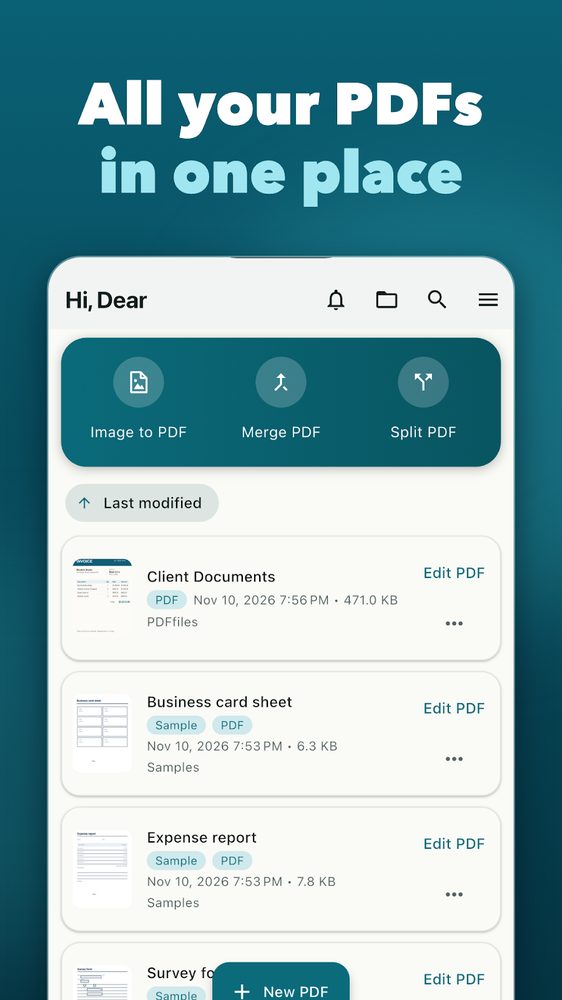
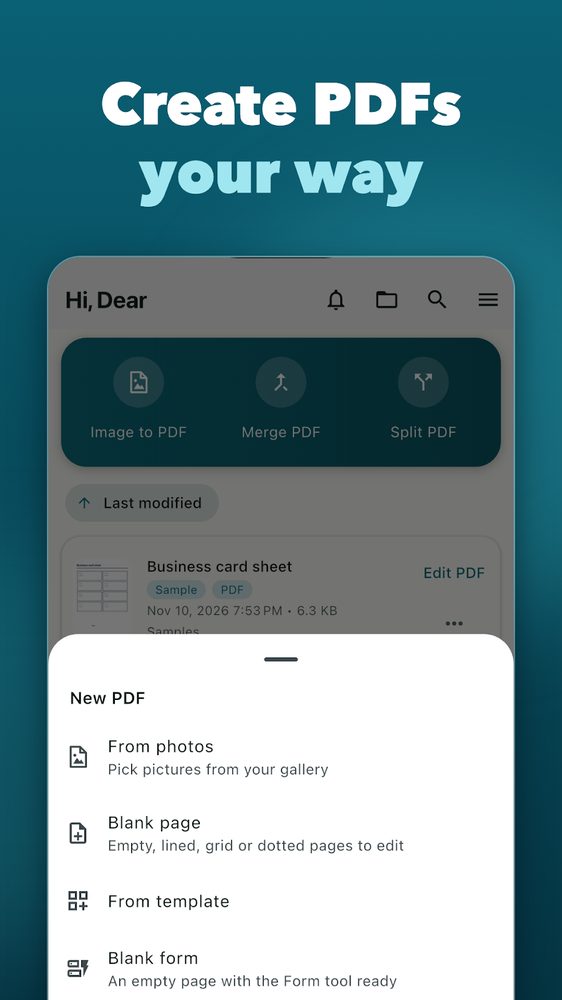
- On the home screen (first screenshot) she taps New PDF, then From photos (third screenshot) and selects all six pictures.
- On the page list (second screenshot) she taps the rotate icon on the sideways row, the crop icon on the page with a table edge in the frame, and drags the handle at the right of row 4 up to position 2.
- She picks A4 (595 x 842 pt), saves with a name like Biology week 3, and opens the result.
Outcome: one 6-page PDF in reading order. Six photos is well under the 20-photo free batch limit in the app configuration, so nothing extra is asked. If she needs it smaller to upload, she can try a lower image-size cap: capping a 4000 x 3000 photo (12 million pixels) to 1600 px on the long side gives 1600 x 1200, or 1.92 million pixels, 84% fewer. File size will not fall by exactly that, so check the estimate and read a page before sending.
Marco sends a signed two-page invoice on Letter paper
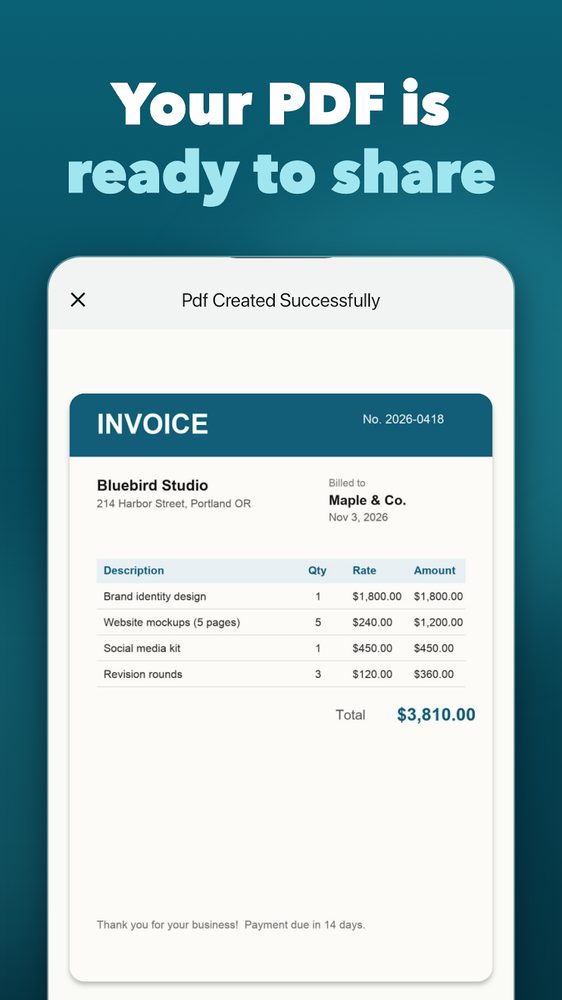
Marco runs a small design studio in Portland. His client signed a printed invoice (one page) and its terms (one page). The invoice lines are 1 x $1,800 + 5 x $240 + 1 x $450 + 3 x $120, which is $1,800 + $1,200 + $450 + $360 = $3,810, the total shown in the fourth screenshot.
- New PDF, From photos, pick the two pictures.
- Check the order on the page list, crop the table background away, and choose Letter (612 x 792 pt, 8.5 x 11 in) instead of A4, since the recipient prints on Letter.
- Save, and on the confirmation screen (fourth screenshot) use the share action to attach it to an email.
Outcome: a 2-page Letter PDF created on the phone without an account. Marco still zooms into the signature and the $3,810 total before sending, as the guide above recommends.
Ana documents a rental inspection with 28 photos
Ana photographed 28 pages of an inspection checklist and room notes. In the app configuration we reviewed, the free batch limit is 20 photos per PDF; larger batches go through a gate (Pro or a rewarded unlock, depending on the version you have). The app accepts up to 500 images in one run.
- She splits the job by room: 14 photos for kitchen and bathroom, 14 for bedrooms. Each is under 20.
- For each set she repeats New PDF, From photos, arranges the pages, and saves as Inspection kitchen-bath and Inspection bedrooms.
Outcome: two PDFs of 14 pages each, which is also easier for a landlord to open than one 28-page file. Merging them later with the Merge PDF button (first screenshot) is a separate feature that may be gated, so we would only do it if one file is required.
How should you balance file size and quality?
There is no useful universal target for every document. Start with the destination’s stated file limit, then choose the least aggressive reduction that meets it while keeping essential details readable. A page of large printed text and a dense handwritten worksheet deserve separate checks.
Adobe’s scan-settings documentation, updated October 22, 2026, describes its Small Size/High Quality control succinctly:
“Sets the balance point between file size and quality.”
— Adobe, Acrobat Help
PDF Maker exposes image-size and quality choices, plus an estimated output size. Those controls let you compare outputs; they do not establish a guaranteed reduction percentage. Our recommendation is to save a readable master, make a smaller sharing copy if necessary, and inspect the smaller file at a comfortable reading size.
- Prioritize detail: keep a higher-quality copy when faint handwriting, small labels, or diagrams matter.
- Prioritize a smaller attachment: try stronger compression, then check text edges and punctuation before sending.
- Prioritize simplicity: remove irrelevant pages and duplicates before reducing the quality of useful pages.
Do not judge quality from the thumbnail alone. Read a difficult section in the actual saved PDF. If dots, accent marks, or thin lines become hard to distinguish, choose a gentler setting or return to the source photos. Avoid promising yourself that a smaller attachment will still be suitable for printing without checking it.
What PDF Maker - Photo to PDF Pro does and does not do
The Google Play listing, checked November 16, 2026, confirms gallery and camera input, page reordering, cropping, rotation, filters, layout controls, estimated file size, merge and split tools, password protection, viewing, and sharing. The source reviewed for this guide also implements local image-to-PDF creation and perspective crop editing.
The important limit: this photo-conversion workflow places images into PDF pages. We have not verified an OCR feature that turns photographed writing into a searchable text layer, so we do not promise searchable scans. Adding text annotations is also different from recognizing all the words in a photograph.
For context, Adobe’s scan-settings guidance, checked November 16, 2026, explicitly identifies OCR as the operation that converts text images into searchable, selectable text. That distinction matters when you need to find a name across scanned paperwork or copy a passage into another document.
We also do not promise automatic document-edge detection, recovery of blurred writing, guaranteed upload acceptance, or a particular compression ratio. Keep originals for important paperwork. Choose this app when assembling and managing a readable PDF is the task; choose a verified OCR workflow when text recognition is the requirement.
What does offline conversion mean for privacy?
The app’s image-to-PDF path reads local image files, processes them on the device, and writes a local PDF. Its settings describe offline document processing. The live Play description, checked November 16, 2026, states:
“Your files stay on your device and no account is needed.”
— NabiGame Studio, Google Play
For the core conversion workflow, the supported wording is: Works offline. No account needed. That is narrower than saying every possible app component never connects to the internet. It also does not describe what happens after you deliberately share a PDF to email, cloud storage, or another service.
Our practical recommendation is to choose the destination deliberately and review what you are sending. For sensitive paperwork, follow the recipient’s approved submission method. Treat local creation, device storage, and delivery as separate decisions; an offline conversion step does not decide the rest of the document’s journey.
How PDF Maker differs from other apps
We make this app, so read these as checkable specifics rather than a verdict.
- No account for the core job. Photo to PDF needs no sign-up, unlike scanner apps that tie documents to a cloud account. Files are read from the gallery and written to the device.
- It works from photos you already have. New PDF, From photos opens your gallery (up to 500 images per run), and per-page rotate, crop, delete and drag-to-reorder are on one list screen. Google Drive scanning is built around capturing with its camera.
- Page layout controls. A4, A3, A5, Letter, Legal or fit-to-image page size, portrait or landscape, margins, and image fit are in the free tier of the app configuration; many converters fix the page at A4.
- Beyond photos. The New PDF menu also creates blank, lined, grid or dotted pages, a page from a template, a blank form, and a PDF from TXT, Markdown, CSV, docx or xlsx files.
- Locking a PDF is free tier; merge, split and some compression levels are defined as Pro or rewarded features in the source. Check the Play listing for the current model; some competitors gate more, some less.
When to pick something else: choose Google Drive or Files by Google scanning, or an Adobe Acrobat workflow, when you need OCR or searchable text, or want automatic edge detection while capturing. PDF Maker does not offer either.
Which approach should you choose?
Compare the job you need done rather than looking for a single winner. The following Google documentation was checked November 16, 2026; its help pages do not display publication dates.
“Scan documents like receipts, letters, and billing statements to save them as searchable PDFs on your Google Drive.”
— Google, Google Drive Help
“You can quickly scan documents in Files by Google and save them as searchable PDFs.”
— Google, Files by Google Help
- PDF Maker: consider it for arranging existing photos, controlling PDF layout, and combining documents locally. Do not assume its photo output includes OCR.
- Google Drive scanning: consider it when searchable scans saved in Drive match your workflow. Google documents crop, rotation, filters, and adding pages.
- Files by Google scanning: consider it for searchable scans with a file-oriented workflow. Google says scanned documents are saved in a Scanned folder under Downloads.
Our preference is to try a representative page before processing a whole packet. Compare the saved result against the actual requirement: readability, search, destination, and page order. If you need help shaping a document workflow, our services page provides context, and you can contact NabiGame with what you need.
FAQ
Can I combine existing photos into a PDF?
Yes. Choose gallery photos through New PDF, review their order, and save the document. Open the result to confirm that every intended page is present.
Can I scan with the camera and correct the crop?
Yes, the app supports camera input and a page editor with perspective cropping and rotation. Review the crop yourself; this guide does not promise automatic edge detection.
Will photographed text become searchable?
Do not assume so. The verified photo-conversion path embeds images, and this guide does not claim OCR support. Use a workflow explicitly offering searchable scans when that capability matters.
Does PDF creation require an account or internet connection?
The core photo-to-PDF conversion works offline without an app account. Sharing through an online service is a separate action governed by that destination.
What should I do if the PDF is too large?
Check for irrelevant pages, then try a smaller image-size or stronger compression setting. Inspect fine print in the saved copy before sending it, and retain the clearer source version.


Comments
Loading comments…