
We make Measly: Ruler & Angle Meter at NabiGame; this guide explains it and the topic, it is not an independent review. Measly combines a calibrated screen ruler, an on-screen protractor, a phone-tilt angle tool and a bubble level for everyday checks. Use it for small, low-stakes measurements; use a suitable physical instrument when fit, safety or a specified tolerance matters.
Key takeaways
- A screen ruler needs a trustworthy physical reference; a sharp display alone does not establish accuracy.
- Measly’s tilt tools use accelerometer readings. A gyroscope measures rotation, which is a different job.
- Screen calibration, angle zero and level calibration solve different problems.
- Measuring works offline without an account, but that does not establish that every app component stays offline.
- Our recommendation: use the phone for a preliminary check, then verify consequential work with an appropriate tool.
What Measly does and does not do
The Measly Google Play listing, checked in November 2026, confirms draggable ruler endpoints, a magnifier loupe, millimetres, centimetres, inches and optional snapping. It also describes a protractor, tilt angle with zero and hold, surface and edge level displays, saved measurements with notes, text sharing and learning material. You can find the app on our Measly overview.
The same listing states the central limitation plainly:
“Measly is not a certified instrument.”
— NabiGame Studio, Google Play, accessed November 2026
Our honest-limits wording is not professional-grade accuracy. We do not promise a universal length or angle tolerance across phones. The guide covers screen contact and phone orientation, not room scanning or automatic real-world dimensions from a photograph. A plausible-looking readout should never substitute for checking whether the method suits the object.
We recommend Measly for crafters comparing paper pieces, students exploring angles, and people checking whether a small stand leans. Think of it as a convenient first check. For ordering a precision replacement part, checking a load-bearing installation or accepting finished construction, choose an instrument and procedure suited to that work.
How does a screen ruler turn pixels into length?
The ruler must relate a distance drawn on glass to a physical length. Pixel density describes how tightly display pixels are packed. Android’s DisplayMetrics reference, consulted in November 2026, distinguishes logical display density from physical density. Its definition of xdpi is:
“The exact physical pixels per inch of the screen in the X dimension.”
That distinction matters because interface sizing and physical measurement serve different purposes. Making a button comfortably readable does not establish a trustworthy ruler scale. In Flutter’s display documentation, also checked in November 2026, the reported pixel ratio can come from hardware, drivers or stored system information and may be inaccurate. This supports checking a physical reference rather than assuming display metadata is a calibration certificate.
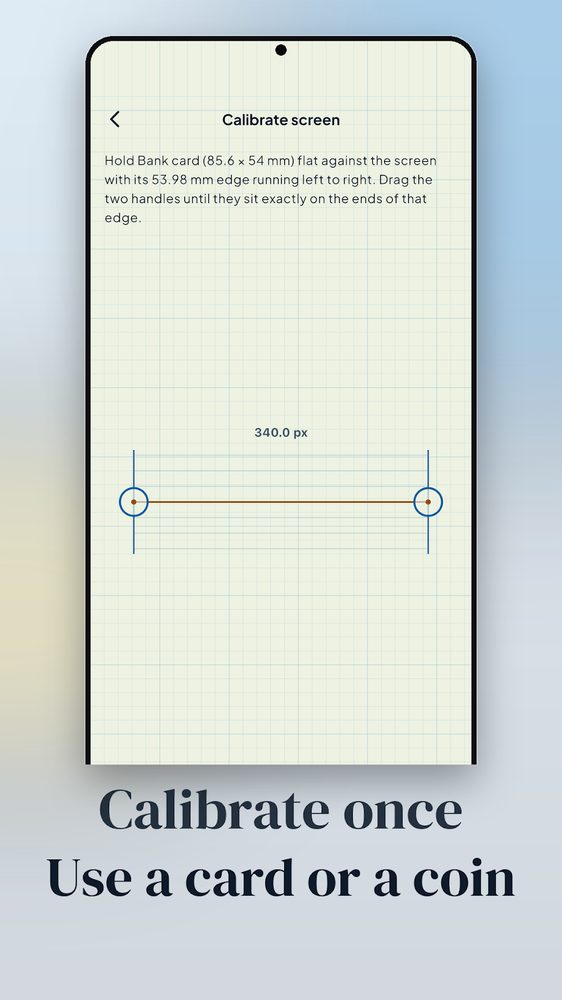
Measly’s calibration matches an on-screen line to a known object and stores horizontal and vertical scales separately. You can choose a supported card, banknote or coin reference, or enter a custom length. Use the exact reference selected in the app; a similarly shaped object is not enough. Our preference is a clean, rigid reference whose relevant edge you can identify without guessing.
The ruler’s loupe helps place an endpoint, while snapping can make placement more convenient. Neither feature corrects an incorrect reference length. If snap pulls a marker away from the edge you mean to measure, turn it off and align the endpoint manually. Read with your eye above the screen, rather than peering from the side.
How do accelerometers and gyroscopes make phone levels work?
Google’s motion-sensor documentation, checked in November 2026, explains the input that makes a stationary tilt check possible:
“An acceleration sensor measures the acceleration applied to the device, including the force of gravity.”
When the phone rests still, the direction of that signal provides a reference for inclination. Movement also affects the signal, so wait for the reading to settle. Measly’s inspected motion code subscribes to accelerometer events and smooths them before calculating tilt. Smoothing makes a fluctuating signal easier to read; it does not prove that the phone rests squarely against the surface.
A gyroscope has another role: it measures the rate of rotation around the device’s axes, as the Android sensor overview describes in documentation checked in November 2026. The inspected Measly tilt path does not subscribe to gyroscope events. It would therefore be misleading to advertise gyroscope-based precision for these tools.
Hardware also varies between devices. Google’s overview cautions:
“Few Android-powered devices have every type of sensor.”
Our practical recommendation is to check behaviour on your own phone before relying on it. Rest it on a stable surface, lift it, replace it and compare the readings. If the result changes noticeably, investigate contact, movement and calibration before interpreting the surface itself.
Which measuring mode should you choose?
- Screen ruler: compare a small, clean object with the endpoints on the display. Choose it when the relevant length fits visibly on the screen.
- On-screen protractor: align the vertex and arms with an angle you can see. This is a geometric alignment task, so endpoint placement matters.
- Phone-tilt angle: align the phone with an edge, set a reference with zero when appropriate, and use hold to keep a reading visible. A relative reference is not automatically horizontal.
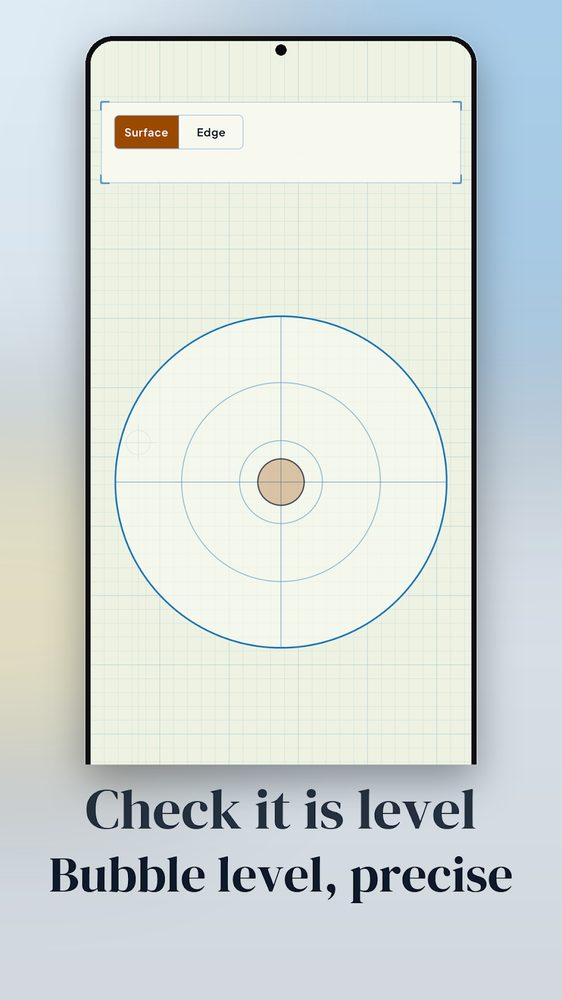
- Bubble level: use the surface display for a resting phone or the edge display when checking along an edge. Ensure the phone has stable contact before judging the result.
Our rule of thumb: name the thing being measured before choosing the screen. “Length of this paper tab,” “angle between these drawn lines” and “tilt of this stand” are different questions. Switching between tools does not make their references interchangeable.
How do you get started in 3 steps?
- Calibrate the screen ruler. Open calibration from the ruler or Settings, select the reference you actually have, and follow the horizontal and vertical matching prompts. Save the calibration. For a custom reference, establish its length with a reliable physical tool first.
- Prepare the measurement. Select the relevant tool and unit. For length, place a clean object gently against the display and align the endpoints. For tilt or level, establish stable phone contact; remove a case if it makes the phone rock. Use level calibration only on a reference you already trust to be level.
- Read, repeat and record. Let the display settle, then reposition and check again. Save a useful reading with a note describing the object and reference. Verify with a physical tool before cutting, purchasing a close-fitting part or making a consequential adjustment.
Keep sharp, gritty, wet or heavy objects away from the glass. We recommend measuring a harmless paper template instead where practical, then checking the actual part with a physical ruler or caliper. Convenience is not worth a damaged screen or a mistaken dimension.
Real examples
These are worked examples with plain numbers. The formulas come from Measly’s source code; the on-screen readings match the screenshots above.
Mai checks a paper tab for a greeting card (ruler, screens 2 and 1)
Mai is making a card with a paper tab that must slot into a pocket, and her real ruler is in another room. She opens Measly, taps the calibration button on the ruler toolbar and picks Bank card. The wizard (second screenshot) asks her to hold the card flat with its 53.98 mm edge running left to right and drag the two handles onto that edge. The handles end up 340.0 px apart, so the scale is 340.0 ÷ 53.98 = about 6.30 px per mm. She repeats the matching for the vertical axis, because Measly stores the horizontal and vertical scales separately, then saves.
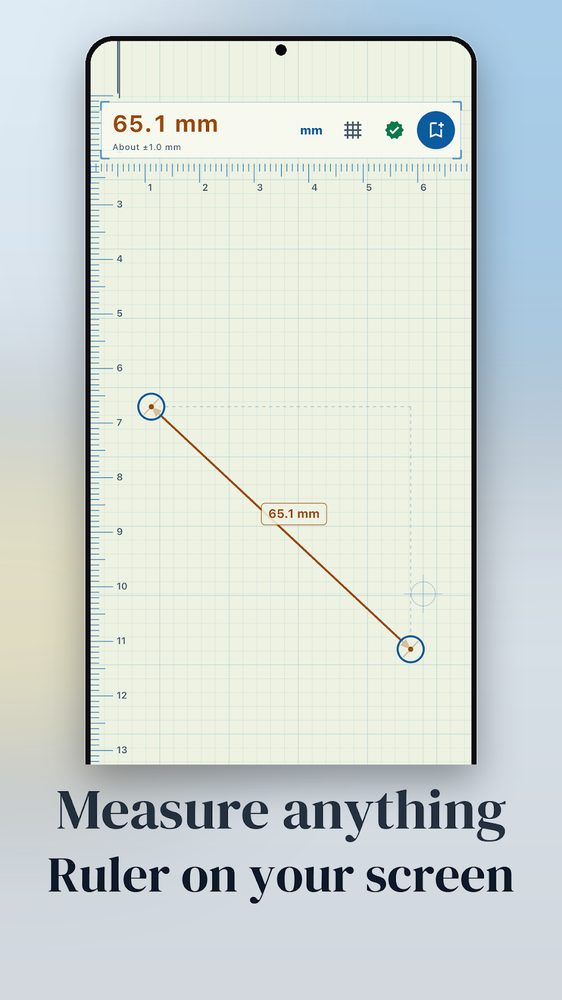
Back on the ruler (first screenshot) she lays the tab on the glass, drags one handle to each end and reads 65.1 mm, about ±1.0 mm. The ± value follows the app’s formula for a calibrated screen: 0.5 mm of finger-and-eye error plus 0.7 % of the length (0.5 + 65.1 × 0.007 = 0.96 mm). Switching the unit to inches with fractions gives 2 9/16 in. Mai cuts the pocket 66 mm wide, leaving a little slack, and saves the reading with the note “card tab”. Without calibration the same reading would have carried about ±5.2 mm (8 % of the length), too loose for this job.
Tuan checks an angle on a printed bracket drawing (protractor, screen 3)
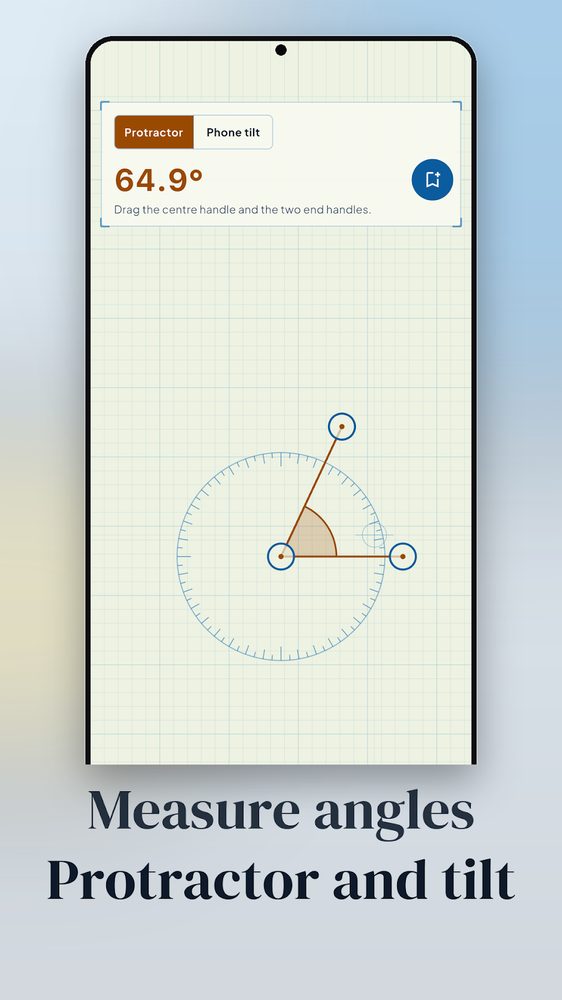
Tuan, a design student, has a printout whose bracket should have a 65° corner. He opens the Angle screen, stays on the Protractor tab, drags the centre handle onto the corner, then drags the two end handles along the two lines (the paper sits on, or is copied next to, the display). The readout shows 64.9°, which is 0.1° from the design value and well inside the care a printed drawing deserves. He saves it with a note.
For a physical edge instead of a drawing he switches to the Phone tilt tab, lays the phone against the edge, presses Zero on the reference edge and then Hold so the reading stays on screen while he lifts the phone. The tilt reading is relative to wherever Zero was pressed, not to true horizontal.
Hung checks whether a phone stand rocks (bubble level, screen 4)
Hung wants to know whether a desk stand leans. First he places the phone on a surface he trusts to be flat and taps the level calibration, so the stored reference is flat. He then opens the Level tab on Surface and rests the phone on the stand’s platform. The bubble drifts toward the high side. Measly’s bubble reaches the outer ring at 10° of tilt, so a bubble about 38 % of the way out corresponds to roughly 3.8°. As a check: a 150 mm phone with one end on a 10 mm shim tilts asin(10 ÷ 150) = 3.8°. He slides a thinner shim under the low corner until the bubble sits in the centre and the phone gives a light haptic tick (if haptics are on in Settings). For a long edge, such as the top of a frame, he uses the Edge tab instead.
How Measly differs from other apps
We make Measly, so read this as a description of design choices, not a ranking. Each point below can be checked in the app or on its Play listing.
- It asks you to calibrate against a real object. Many screen rulers simply use the phone’s reported pixel density. Measly offers a bank card (85.60 × 53.98 mm), a US banknote, a 1 euro coin, a US quarter or a custom length, and stores X and Y scales separately. If you skip calibration it says so and shows roughly ±8 %.
- The error estimate is on screen. Next to the reading you see “About ±1.0 mm” instead of a bare number. It is an estimate, not a guarantee.
- One app covers four jobs without a camera. Ruler, protractor, tilt angle and bubble level live in one place, and saved readings keep notes and can be shared as text. Measly deliberately does not do camera or AR measuring, so it cannot measure a room or a distant object the way Google Measure or similar AR tools try to.
- Offline, no account. Measuring, calibration and saved readings work without sign-in or a network, and they are stored on the device.
- Ads stay out of the way of the instruments. Banner ads appear on the padded pages, not on the full-screen tool tabs, and ad requests wait for the consent prompt. We found no in-app purchase code in the source, so there is nothing to unlock.
- Fractional inches and snap. Inch readings can show 1/32 in fractions, and optional snap rounds to 0.5 mm, 0.05 cm or 1/32 in.
When to pick something else. Use an AR measuring app for a room, a wall or anything bigger than the screen; use a physical tape, caliper or spirit level when a tolerance, fit or safety matters; use a dedicated app with a gyroscope-based or fused sensor if you need that, since Measly’s tilt tools use only the accelerometer. Ads are present (banners and consent), so a fully ad-free app will suit you better if that matters.
What can calibration fix, and what remains uncertain?
Screen calibration corrects the scale. It cannot fix a misplaced endpoint, a bent reference or a fuzzy object boundary. A thick object also puts its upper edge above the display, making alignment sensitive to your viewing position. Looking straight down helps you judge the edge consistently.
Level calibration establishes a baseline. If you calibrate on an unknown slope, you can make that slope look like your reference. Check the reference independently first. A case lip, curved back or camera bump can change how the phone sits; calibration cannot make unstable contact reliable.
The uncertainty display is an estimate. Measly’s ruler code calculates its displayed uncertainty from a formula that changes with calibration status and measured length. It is not a laboratory certificate for your handset. We recommend treating it as a reminder to question the result, not a promise that every reading falls within the displayed interval.
Repeated readings reveal inconsistency, but consistent readings can still share the same bad reference. Our suggested check is to measure a known object after calibration, then try another known length. If the checks disagree, revisit alignment and the selected reference before using the ruler for anything else.
When should you use a physical tool instead?
For a craft layout, the phone can help compare a small tab or inspect a drawn angle. For a tabletop stand, a tilt check can help explore which adjustment changes the lean. These are suggested uses, not tested accuracy claims or endorsements for a particular project.
Choose a physical ruler or tape for lengths beyond the screen. Choose a suitable caliper for a part that must fit closely. Choose a spirit level with an appropriate contact span for shelving, and follow the installation instructions. If the job specifies a tolerance or inspection method, use equipment capable of meeting it.
Does offline use mean no data collection?
No. The Play description, checked in November 2026, confirms offline operation and no account requirement. The local source stores measurements and calibration on the device. Those facts support using the measuring tools without signing in or depending on a measuring backend.
However, the inspected README also describes ads and analytics through the shared studio SDK, while the live Play data-safety section declares no collection or sharing. We cannot reconcile that difference from these materials alone, so we do not make a blanket no-tracking claim. Offline measuring and the behaviour of advertising or analytics components are separate questions.
Our view is that a useful utility should make its limitations easy to understand. Explore our apps and community tools, see our development services, or contact NabiGame Studio with a question about Measly or a confusing measurement.
FAQ
Can Measly replace a real ruler?
It can help with small, low-stakes screen measurements after calibration. Use a physical ruler, tape or caliper when the object exceeds the screen or the required fit matters.
Does Measly need a gyroscope?
The inspected tilt implementation uses accelerometer readings, not a gyroscope stream. The on-screen ruler and protractor involve screen alignment rather than that tilt input.
Why does the bubble move while I hold the phone?
Hand movement affects the accelerometer input. Rest the phone securely and let the reading settle before comparing results.
Do I need an account or internet connection to measure?
No account or network connection is needed for the measuring features described here. That does not establish that advertising or analytics components never communicate online.
Is a saved reading proof of accuracy?
No. Saving preserves a reading and its context; it does not validate the calibration, contact surface or alignment that produced it.
Sources
- NabiGame Studio: Measly on Google Play — accessed November 2026.
- Google: DisplayMetrics reference — accessed November 2026.
- Flutter: devicePixelRatio documentation — accessed November 2026.
- Google: Motion sensors — accessed November 2026.
- Google: Sensors overview — accessed November 2026.
Comments
Loading comments…